nail art tutorial step by step glitter
See how to do it step by step. Oct 6 2019 - A beginner-friendly tutorial on how to make a super simple glitter fade on nails.

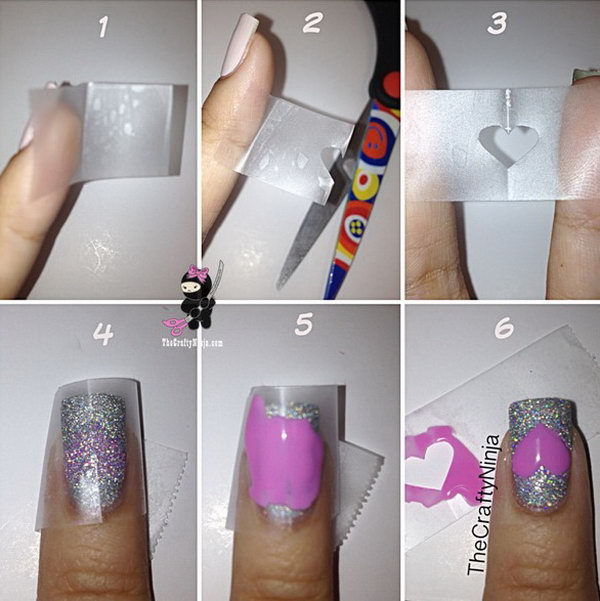
Nail Art Tutorial Pink Glitter Gradient Nailpro
Making it one thats a bit outside-the-box in tradition and not just a new color.

. November 11 2016 by admin Leave a Comment. There is nothing wrong with a plain coat of paint but the art just adds a PO. Once this dries apply.
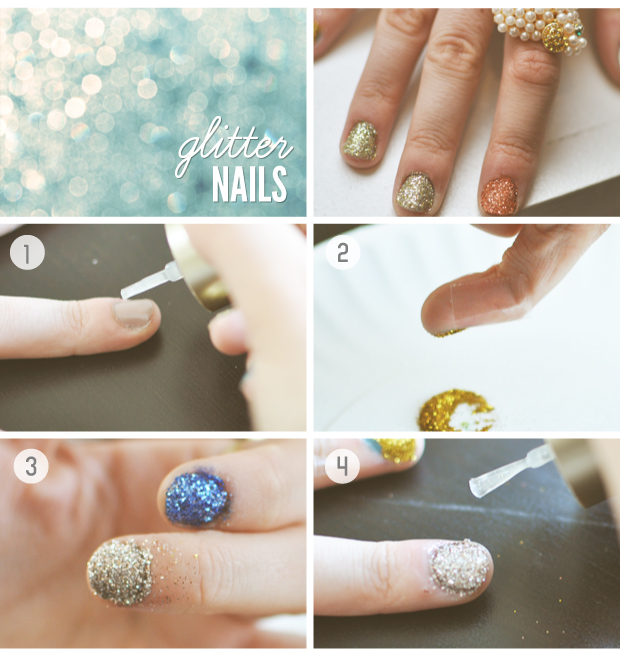
Dip your nail in the pot of glitter laying it flat over the surface and rolling it back and forth a bit to cover the sides. We girls love playing with special effect nail art designs to guarantee a successful outcome. A step-by-step approach serves the best when it comes to nail art.
Apply 1 coat of OPI GelColor Base Coat to properly prepped nails. 20 Easy and Fun Step by Step Nail Art Tutorials. Paint nail polish B down to 13 of your fingertips 27 Glitter Nail Designs and Creative Ideas.
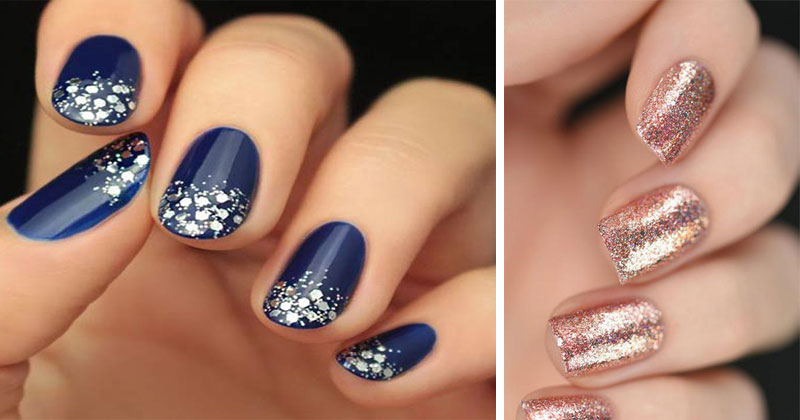
Apply good quality hand cream on your hands especially on the skin around your nails. Whether you are looking for nail designs to wear out on the town or cute art ideas for a special occasion or holiday we have the best easy s. Glitter Fade Nail Designs.
For any questions or doubts you can leave it in the comment section and I will answer you in. Use a light brush pressure near the cuticle to deposit more glitters and increase your brush pressure as you move down. 3 Select one among the multiple forms of glitter to apply on your nails.
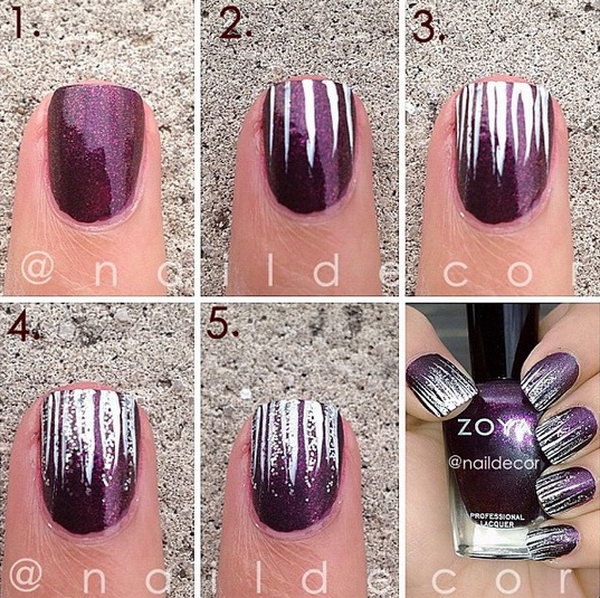
Easy Stripes with Glitter Nail Art. Apply a layer of clear gel and cure for two minutes in a UV lamp. Blend the blue and red by lightly brushing backwards.
Paint nail polish on all nail first 2. Wash your nails with a fine quality sanitizer. Cure 30 seconds in Dual Cure LED Light.
Well here is a glitter ombre nail art tutorial for diwali to glam up those nailsT. Apply 1 coat of OPI GelColor Stay Shiny Top Coat and cure for 30 seconds. Repeat Step 2 if desired for more coverage.
Glitter Nail Art Ideas Step by Step Written By Loyd Humitivem Tuesday December 7 2021 Add Comment Edit Colorful patterns and unique designs its so fun getting a manicure that suits the season or your own personality. Nail artist Christian Mans with Bio Sculpture Gel used monochromatic black and white paired with rhinestones and glitter to create this elegant design. With OPI GelColor Feel the Chemis-tree push the product to create an additional cuticle line.
Can you imagine such a. Apply a fine glitter polish to the edges of your nails and dab lightly to spread the glitter. Apply to the nail starting at the cuticle then fade towards the nail tip stopping at roughly half the length of the nail.
Most DIY tutorials for nails recommend the glitter look which requires painting your nails with alternate layers of sheer and glitter. Paint nail polish B down to 23 of your fingertips 3. Step By Step Tutorial For Glitter Nail Designs Step 1.
Apply two coats of sapphire nail polish and allow it to dry. Apply two thin coats of OPI GelColor Ornament to be Together. Apply a layer of black 2017-Licorice on the entire nail and cure for two minutes.
2 File your nails to give them a neat look. Diwali is just round the corner and we all are just want to look our best. 20 Easy And Fun Step By Step Nail Art Tutorials Noted List Easy Stripes with Glitter Nail Art.
Make sure to apply it evenly so that the glitter will stick to the entire nail. Dip your nail in the pot of glitter laying it flat over the surface and rolling it back and forth a bit to cover the sides. Sparkle Nail Idea is something other than whats expected a brightening and engaging thought for originators nails its straightforward and simple thoughts for amateurs and everybody its a flexible nail thought you can plan urself in any shading and structures as per your dress shading in hardly any means you can make it effectively Please follow the given steps-.
Dry them off and you are done. Much more peopled would be. You can also use a small dry nail art brush to help you feather out the product.
Cure for 30 seconds. All-Over Glitter Photos by me Apply a clear base coat. But the purchasing at nail salons are always expensive.
1 Manicure your nails in order to get them prepared for the glitter nail art. Cure each coat 30 seconds. Show off your glittering nails to your friends and wallow in their praise for hours.
Repeat the process with the blueglitter acrylic mixture starting at the center of the nail brushing toward the nail tip. This is a tutorial step by step for the PINK GLITTER design. Tap your finger to remove any extra glitter.
Your nails are a reflection of who you are and deserve to be decorated as such.

Diy Glitter Gradient Nails Nails Diy Craft Nail Art Nail Trends Diy Nails Diy Nail Art Easy Craft Purple Glitter Nails Glitter Gradient Nails Glitter Nail Art
20 Easy And Fun Step By Step Nail Art Tutorials Noted List
20 Easy And Fun Step By Step Nail Art Tutorials Noted List
Step By Step Tutorial For Glitter Nail Designs
Gradient Glitter Nail Art Tutorial How To Paint A Gradient Nail Beauty On Cut Out Keep

10 Easy Glitter Nail Ideas Nail Art Compilation Youtube
Diy Glitter Nail Art Tutorial

50 Easy Nail Designs Cuded Nail Art Hacks Nail Art Nail Art Diy
0 Response to "nail art tutorial step by step glitter"
Post a Comment